Sewing Boot Camp: Beginning to Sew Tips for Fashion Designers

Machines & Tools

It is said that the longest journey starts with the first step. So it is true for those who want to learn to sew or embark on their first sewing classes.

Many places you don’t even need to have your own machine, but once you begin, you will find that you want to work on your projects on your own time and will soon find yourself seeking out a sewing machine that is right for you. Your first sewing machine may come to you as a hand me down or you may purchase a new one.

Electronic machines with a lot of options are available at a very reasonable price( under $200) and it’s not necessary to purchase a premium brand or anything high end if you are just beginning.Either way you will want to have the instruction book if possible, if  you don’t, you  may be able to find it on line.

You will also need a few needles in several sizes (9,11,14,16) and a couple of extra bobbins.  Other materials you will need to begin with are a sewing box. Tackle boxes work well or almost any type of plastic craft box with compartments, a secure closure and  a handle will work.

In your sewing box, you will need to have a pin cushion, straight pins, a tape measure, needles for hand sewing, basic colors of thread, black, white and natural, a fabric scissors or you may even opt to add a rotary cutter, a paper scissors, a small nippers for at your machine, a seam ripper and a tracing wheel, preferably with spikes or at the least, serrated.  Your collection of materials and tools will grow as you learn.

Finding a Teacher

Finding a place to learn is your next quest. Sewing has become a bit of a lost art that is in the midst of a revival as bad economic times is leaving a space to create a renaissance of sorts for all of the skills that our mothers and grandmothers had before we became a throw away society.

Many community colleges offer adult education classes  and there are also small sewing instruction companies popping up all over…. Of course, you may say, why should I pay when U Tube is free? Well of course it’s free but the snippets are short and often broken up.  You will probably find that you can only get so much for free, and then it will take you to a page to sign up for on line classes.

I never learned from an online class so I can’t comment as to how well it could work for you. I can tell you that in the beginning, you will need a patient, experienced instructor to hold your hand, encourage you and teach you not only the in and out’s of your exact machinery, but to also put you on the right path to develop good sewing habits so your projects will look professional, fit, and make you feel good about your creation!

Your Measurements & Pattern Selection

So, you are ready to start sewing something. But what?  There are many simple projects like purses that you get online, but lets talk about commercial patterns.

As you get ready to march to your local fabric store, go armed with your basic measurements.  These critical basic measurements are your bust, your waist and your hips.

To take these measurements, wear a good support bra, bring the tape measure around your back even with your bust and take a relaxed measurement at the fullest point.

Do the same with your waist ( your true waist is about 1″above your belly button, NOT where your jeans rest!) and finally, your hip at it’s fullest point which is between 7-8 ” below your true waist.

Most fabric stores like Joannes, have large catalogs of all kinds of patterns. Simplicity brand is just as it state, although the fit is not always the best, McCall’s  is a little better, Butterick is generally a good fit and was the very first paper pattern available way back in the late 19th century!

Vogue patterns tend to be very expensive and more difficult. Watch for a sale to stock up on your patterns.  Look for a style that will flatter your body shape, is rated as “easy” and is made from a woven vs. a knitted fabric.

Compare the measurements on the envelope to yours to know what size to buy. Just because you buy an 8 in the store, does not mean you need an 8 pattern.

If your measurements don’t match the envelope exactly, go with what is the closest.The patterns are kept in the drawers under the catalogs and you may need a clerk to help you find your choice.

This envelope contains the full size tissues pattern in three sizes, full instructions of how to sew, how much fabric to buy, what notions you will need like inter-facings, buttons or zippers and fabric suggestions.

Fabric Selection

On the back of the envelope you will also find suggested fabrics.  If you don’t know very much about fabrics, hopefully, the staff at the store can point you in the right direction. Most of your woven fabrics will come 45/48″ wide.

Follow the back of the envelope to know how much you need to buy. If there is a sale table, or a remnant table that is often a great way to get discounts on fabric. Fabric is rolled onto bolts with the ends draped over so you can see the pattern.

Look under the draped part to find the price per yard, the content and the care. Look for something machine washable, not too see sheer, medium body weight and of a comfortable fiber like cotton or cotton rich.   Don’t forget your matching thread and zippers or buttons!  To match the thread, unroll a little bit and hold against your fabric to find best match. I recommend dual duty in a 50 or 60 weight. This is a poly core with cotton wrap so it’s strong but holds great color and does not shrink.   You will also need to purchase an interfacing. That is an unseen layer that you will apply to certain area to give them strength and body.

So now you will be ready to learn to sew with baby steps. Watch for my next blog to know how to get started!

Beginning Designers Q & A

Can I learn to sew and design if i have never sewed before?

Yes, we will teach you the very beginner basic. If you already have portable machine you are welcomed to bring it with you and we will instruct you on it’s care and use, or you can use our machines at Mia Fashi Studios.

Do I need a lot of expensive materials and how do I know what to buy ?

There is an initial investment in any hobby, craft or avocation. You will need to buy a few things to start out with but many of them you will accumulate as your progress moves forward. For sewing you will need  something to hold your supplies. Tackle boxes and craft boxes work great. Inside you will have:

  • Pincushion and straight pins
  • Hand sewing needles
  • Black, white and beige threads
  • A nippers to use at the machine
  • Beeswax for hand sewing
  • Tape measure
  • fabric scissors and a paper scissors
  • Tracing wheel
  • a Binder or note book for notes and hand outs

These as well as patterns are all available at your local fabric store and coming soon we will have some “kits” that you can purchase from us to get you started.  As you progress, you will discover other materials that you may need.

Can I learn pattern making with out knowing how to sew?

It is necessary that you have basic sewing skills to be able to sew together for your fit shells from pattern making.  Start with Sewing  if you are a true novice.

Is it easier to just change around a commercial pattern vs. making a pattern from scratch?

It has been our experience that you need to understand basic pattern making and fitting principles before you can understand how to adjust someone else’s pattern.

Yes, lengthening, shortening is simple and sometime just taking  in the side seams are simple however more complicated fit issues like small shoulders, wide hips, hollow backs, sloped shoulders, heavy arms, all  effect more than one point and take a clearer understanding of pattern basics to achieve.

How long does it take to learn how to sew or to make a pattern?

Everyone learns at a different pace and the more you already know the faster you should be able to learn new skills. You should be able to sew a simple top in your first class!

Pattern making takes a little longer as it is more complicated. depending on the method you use you should be able to start constructing your first original simple garment after 6-12 weeks of instruction depending on how much time you work with it away from class.

Do I have to be an artist to be able to draw so I can illustrate my designs?

No you do not have to be an artist. we will help you and give you easy instruction and shortcuts to be able to get your ideas on paper!

How To Use Basic Knit & Purl To Create A Wide Variety Of Beautiful Stitch Designs

In my last teaching experience of Knitting, I learned that not only can I teach a beginner or seasoned knitted how to read a pattern, but apparently after all my years of pattern design, I can also teach you to create your own original patterns!

All you need is a few body measurements, chose a stitch pattern, a yarn, an appropriate needle and establish your gauge.

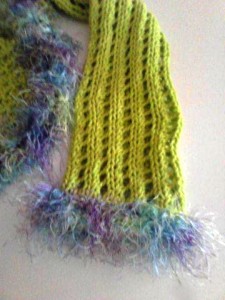
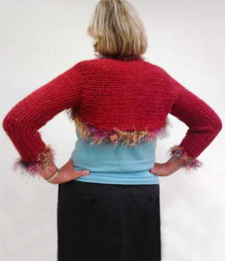
This does not have to be a complicated design and you don’t have to know a lot of fancy stitches. A basic Knit & Purl can yield an extraordinary amount of stitch design. In the photos attached you see a simple 5X5 box stitch, a simple stockinette stitch and a variation of a Like Lace stitch.

You can really choose any yarn that strikes you and you may want to try your choice of stitch and a couple of different size needles to discover the look you want, then you need to knit a 4×4″ square to determine your gauge.

Your Gauge tells you how many stitches per inch and how many rows per inch. Once you know that you can develop your pattern. The green and white samples shown use Lily Sugar N Creme or Lion Cotton both 4 ply worsted and a pair of 7 1/2 straight needles and a size 7 Circular needle. Our gauge was 4 stitches per inch more or less depending on the stitch pattern. 5 rows = 1″

Example:
3/4 length sleeve 15″ long total
Fore arm: 9″ (9×4=32 stitches)
Upper Arm: 12″ (12×4= 48 stitches)
across shoulders at back:=15″ (15×4=60″)

So cast on 32 stitches, work in pattern for 9″ then you start your increase: 48-32=16/2=8 You need to increase 8 stitches on each side to create your upper arm measurement. 5 rows = 1″ so if you increase 1 stitch at the beginning and at the end of the next 8 rows (48 stchs) work in pattern for 1 ” more ( 5 rows) and start your increase for back (60-48=12/=6) increase one stitch at the beginning of each of the next 12 rows keeping to pattern (60stchs).

You should have about 12″ in width at this point Stitch marker. Knit in pattern for your across back measurement of 15″. Then you just follow your increase backwards to make your decrease. Use your stitch markers to act as a visual measurement comparison.

Block your piece after binding off with a steam iron to even up any skew and curing edges. Using a tapestry needle sew together your sleeve portions.

Try on to make sure you can get into it. Then you need to measure from behind your CB neck across your front and around the back ( outer edge of shrug) this will tell you how big your edging or collar needs to be. Lets say it’s 54, so you will need to pick up 216 stitches all around the neckline. Do this with a circular needle and work in chosen pattern to meet your design requirements for collar or trim. Bind off.

This is all easier than it sounds and once you learn this principle you will find it easy to more forward and create more complicated patterns and styles. Watch for another block on how to block them out on graph paper! It should keep you in stitches!!!